
Checks are still an essential financial instrument for both personal and corporate transactions, even in the age of digital payments. Banks and check brokers store copies of checks for up to 99 years, resulting in large check archives. To guarantee smooth processing and avoid fraud, it is necessary to follow certain formatting guidelines, legal requirements, and security precautions while how to write checks.
The knowledge of these costly mistakes will increase your financial literacy and transaction security, regardless of whether you are writing your first check or want to hone your current abilities. Get ready with a pen and check paper to practice till perfection.
Everything from simple entry methods to sophisticated account management procedures is covered in detail, which offers step-by-step directions for writing perfect checks. Let’s dive in!
Table of Contents
How to Write a Check: Main Things You Must Know
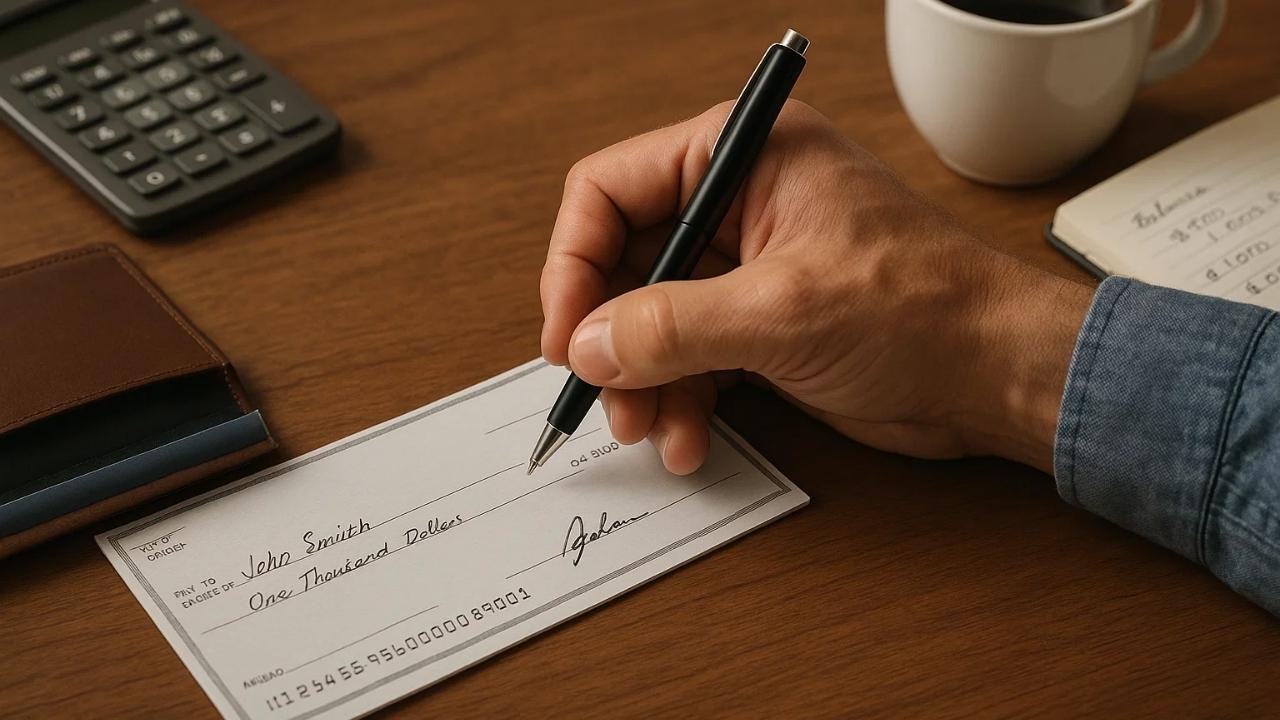
Before you put pen to paper, it’s important to understand what makes up a check and how to prepare properly. Every check has essential parts like the date, payee, amount, and signature, which must be filled out correctly to ensure it goes through without a hitch.
Make sure to use a reliable blue or black ink pen, never pencil, as checks can’t be processed if altered or unclear. Just as important, double-check your bank balance to confirm you have enough funds to cover the check and any potential bank fees. Being prepared from the start helps avoid bounced payments or delays.
Important elements of a check consist of:
- Date line (upper right corner)
- Pay to the order of (recipient’s name)
- Numeric amount box (dollar amount in numbers)
- Written amount line (dollar amount in words)
- Memo line (optional description)
- Signature line (account holder’s signature)
- Pre-printed information (your name, address, bank routing number, account number)
Always use the next available check in your chequebook sequence to maintain proper record-keeping. Keep your chequebook in a secure location and never sign blank checks or leave checks unattended.
Correctly Adding the Date in a Check
The date field on a check plays an essential role as both a record-keeping tool and a legal marker that dictates when the check can be processed. It is important to write the current date clearly in the upper right corner of the check, using a consistent format such as MM/DD/YYYY or Month DD, YYYY, which helps prevent confusion or delays during processing. Timing is also a significant consideration when dating checks.
Checks should typically be dated with the current date to ensure proper and timely processing. While post-dating a check signals a later cashing date, banks are generally not obligated to honour this and may process the check upon receipt.
Checks older than six months, known as stale-dated checks, may be rejected by banks. Backdating checks is illegal and considered fraudulent. If an error occurs with the date, voiding the check and issuing a new one is the best practice to maintain transparency and avoid complications.
Filling in the Payee Name Correctly
The “Pay to the order of” line requires precise identification of who will receive the payment. Write the recipient’s full legal name exactly as it appears on their identification or business registration. For businesses, use the complete legal business name rather than abbreviations or trade names when possible.
Guidelines for different payee types:
- Individuals: Use full legal name (John Michael Smith, not John M. Smith)
- Businesses: Include complete business name and legal designation (ABC Company LLC)
- Organizations: Use the full organizational name (American Red Cross)
- Government entities: Use official department or agency names
If paying multiple parties, you can write “John Smith and Mary Johnson” (both must endorse) or “John Smith or Mary Johnson” (either can endorse). Avoid using nicknames, abbreviations, or unclear designations that might complicate the check-cashing process.
Numerical Amount Entry and Decimal Precision
When filling out the numeric amount box on a check, write the dollar figure close to the left edge to prevent tampering. Always include the decimal point and two digits for cents, even if it’s a whole dollar amount (e.g., $100.00). For amounts with cents, ensure the cents are clearly shown as two digits (e.g., 05 for five cents) to avoid confusion and ensure accurate processing.
Best practices for numerical amounts:
- Start writing immediately after the dollar sign
- Use clear, legible numbers
- Include two decimal places for cents
- Draw a line after the amount to fill the remaining space
- Double-check accuracy before proceeding
| Amount | Correct Format | Incorrect Format |
| One hundred dollars | $100.00 | $100 |
| Twenty-five dollars fifty cents | $25.50 | $25.5 |
| One dollar, five cents | $1.05 | $1.5 |
For amounts with cents, ensure the decimal point is visible and the cents are written as two digits (05 for five cents, not 5).
Written Amount Translation and Legal Requirements
The written amount line serves as the legal amount if discrepancies exist between the numerical and written amounts. When mastering how to write a check, begin writing immediately after “Pay” and continue to the end of the line. Write out the dollar amount in words, then add “and” followed by the cents as a fraction over 100.
Standard format examples:
- $156.78 = “One hundred fifty-six and 78/100”
- $1,000.00 = “One thousand and 00/100”
- $25.50 = “Twenty-five and 50/100”
Special considerations:
- Use hyphens for compound numbers (twenty-one, thirty-seven)
- Capitalise the first letter only
- Write “and” only before the cents fraction
- Draw a line to fill any remaining space on the line
- Never use abbreviations or symbols
If the written amount extends beyond one line, continue on the next line, but ensure the fraction portion (cents) appears at the end. Common errors include writing “dollars” after the amount (redundant) or using decimal points instead of fractions for cents.
Memo Line Usage and Record-Keeping Enhancement
The memo line, while optional, provides valuable information for both you and the recipient regarding the payment’s purpose. This field helps with personal record-keeping, tax documentation, and account reconciliation. Write a brief, clear description of what the payment covers.
Effective memo line examples:
- “Rent – January 2025”
- “Invoice #12345”
- “Birthday gift”
- “Utilities – Electric”
- “Car payment”
Professional considerations:
- Keep descriptions concise but specific
- Include invoice or reference numbers when applicable
- Avoid sensitive personal information
- Use consistent terminology for recurring payments
The memo line information may appear on bank statements and cancelled checks, making it useful for tax preparation and expense tracking. For business checks, memo lines help with bookkeeping and audit trails.
Signature Requirements and Security Measures

Your signature serves as authorization for the bank to process the payment and must match the signature on file with your bank. Sign using the same signature style you used when opening the account, maintaining consistency in pen pressure, size, and formation.
Security best practices:
For optimal security, always sign a check only after filling in all other fields, using a blue or black ink pen to ensure authenticity. Sign exclusively in the designated area and maintain consistency with the signature your bank has on record. Never sign blank checks, as this leaves you vulnerable to fraud or unauthorised use.
Additional security measures:
To protect your checks, store them securely and always use them in sequential order to detect any missing ones easily. Report lost or stolen checks immediately to prevent unauthorised use, and consider checks with security features like watermarks or special paper for added protection. Limit access to your chequebook to trusted individuals only to reduce the risk of fraud.
If you make an error while writing a check, void it by writing “VOID” in large letters across the face of the check, then start over with a new check. Keep voided checks for your records, but ensure they cannot be processed.
Many people ask how to write a voided check or how to write a void check for purposes like direct deposit setup. Simply write “VOID” clearly across all critical fields while keeping account information visible.
Account Management and Reconciliation Practices
Maintaining accurate records and regularly reconciling your checking account ensures financial stability and prevents overdrafts. Immediately after writing each check, record the transaction in your check register or banking app, including the check number, date, payee, amount, and purpose.
Monthly reconciliation process:
- Compare your check register with your bank statement
- Mark off cleared checks and deposits
- Note any bank fees or interest earned
- Identify outstanding checks and deposits
- Calculate your adjusted balance
- Investigate any discrepancies immediately
Check reordering and management:
- Order new checks when you have approximately 10-15 checks remaining
- Verify your current address and phone number when reordering
- Choose security features like watermarks or special paper
- Consider online banking alternatives for recurring payments
- Keep track of check numbers to identify missing checks
For customers wondering how to write a check, Chase or other major banks, the process remains consistent across all financial institutions, though specific security features may vary.
Creating void checks: For direct deposit setup or automatic payments, you may need to provide a voided check. Write “VOID” in large letters across the face of the check, ensuring all critical information remains visible, but the check cannot be processed for payment.
Regular account monitoring through online banking, mobile apps, or monthly statements helps detect unauthorised transactions and ensures your records remain accurate. Set up account alerts for low balances, large transactions, or unusual activity to maintain better financial control.
You NEED to READ: Corpenpelloz Revealed: The Truth Behind Its Growing Popularity
Conclusion
How to Write a Check is more than just an old-school payment method; it’s a crucial financial skill that still holds value in today’s digital world. Whether you’re paying rent, sending a gift, or dealing with a vendor who prefers traditional methods, knowing how to write a check ensures security, flexibility, and reliable record-keeping. Even with the rise of online banking, there are still many situations where writing a check is the smartest option.
The foundation of mastering how to write a check lies in the details. From entering the date and payee to accurately writing the amount and signing it correctly, consistency and care make all the difference. Following a structured approach helps you avoid errors and ensures each check is processed without issue.
To truly excel in how to write a check, practice good habits like reconciling your bank account regularly, keeping detailed records, and securing your chequebook. Using ink, avoiding overwriting, and maintaining a steady signature not only protects your finances but also reinforces your professionalism.
FAQs
1: What happens if I make a mistake while writing a check?
Mistakes happen, but when you’re learning how to write a check, accuracy is everything. If you make an error, it’s safest to void the check entirely by writing “VOID” in large letters across its face. Avoid using correction fluid or crossing out sections, as this could lead to bank rejection or concerns about fraud. It’s always better to start fresh with a new check to ensure it processes smoothly.
2: How long does a check remain valid?
Understanding expiration timelines is an important part of knowing how to write a check correctly. Most personal checks remain valid for up to six months from the date written, although some banks may choose to honor them after that period. Business checks, on the other hand, often expire after 90 days. When in doubt, consult your bank to confirm their policy on stale-dated checks.
3: Can I write a check for more money than I have in my account
Writing a check without sufficient funds (overdrawing) can result in overdraft fees, bounced check fees, and potential legal consequences. Always verify your account balance before writing checks, and maintain adequate funds to cover all outstanding checks.
4: How do I write a check with cents?
Write the dollar amount in the numeric box with a decimal point and two digits for cents (e.g., $25.50). In the written amount line, write the dollars in words, followed by “and” and the cents as a fraction over 100 (e.g., “Twenty-five and 50/100”).
5: What’s the difference between a cashier’s check and a personal check?
A cashier’s check is guaranteed by the bank and drawn on the bank’s funds, while a personal check is drawn on your account. Cashier’s checks are often required for large purchases like cars or homes because they provide guaranteed payment.